The Website contains some areas where an image needs to be of a certain size. The Carousel being a notable example.
The Carousel
The Carousel requires an image to be at least 1000 Pixels wide in order for it to fill the space. Anything smaller than this gets left alone.
Identifying an Image’s Size.
- On PC: Find the image on your computer and hover your mouse over the image file. A box will pop up with the images Width and Height
- On Mac: Find the image on your computer, select the file and hit CMD – I to get the images information. The size will be there.
- In Photoshop: Open your image in Photoshop and go to Image > Image Size using the top menu.
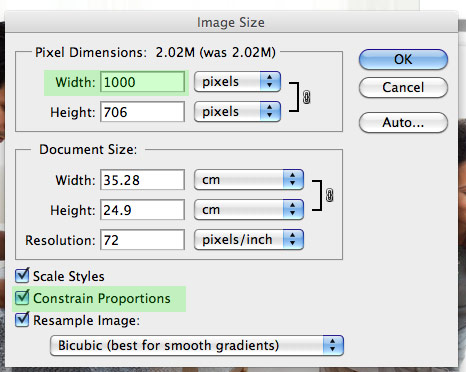
Resizing an Image in Photoshop
- Go to Image > Image Size using the top menu
- Make sure that Constrain Proportions is ticked (this keeps the percentages of width and height intact, so the image doesn’t become too tall or to narrow)
- Input the new Width and hit OK.
Cropping an Image in Photoshop
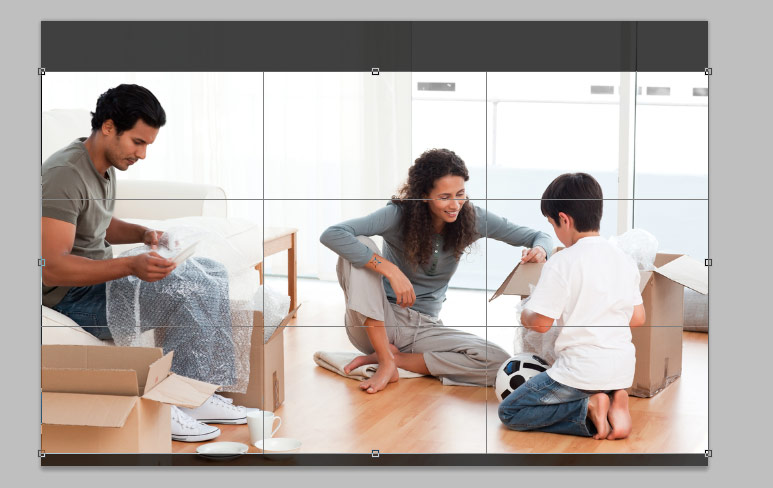
- Click on the crop tool icon or press C.
- Click and Drag the cursor to make a box around the area you would like to crop the image to.
- Hit Enter to confirm the crop
- Save the image!
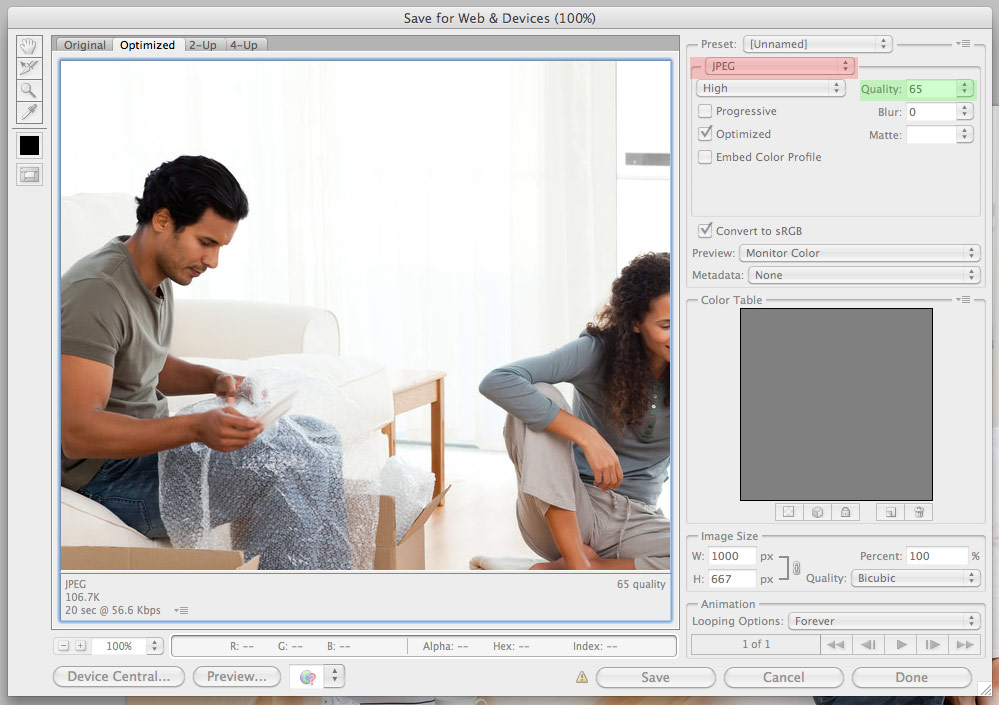
Saving Images for the Web using Photoshop.
- Go to File > Save for Web and Devices in Photoshops top menu
- From the right hand drop down, make sure you have JPEG selected and set the quality to 65%
- Hit Save.
Understanding Digital Images
Digital Images are measured in Pixels. Tiny dots of pictorial information that come together to make a whole image.
In Print, high-resolution images are used to give a finer quality, as paper is a cleared format than a computer screen and can therefore handle more detail.
Resolution is measured in Width, Height and a third factor called DPI.
DPI stands for DOTS PER INCH.
A high resolution image for Print will be 300 DPI. So for every INCH it has 300 pixels.
On the internet, images have a lower DPI of 72. The reason it is lower is two-fold.
- Monitors are not capable of showing as much quality as printed material, so a high DPI of 300 is not needed
- On the internet, images have to load quickly. A 72 DPI image will load faster than a 300 DPI image.
The trouble with Resizing Digital Images
If you imagine an image as being made up of tiny dots, what would happen to these dots when you make the image larger?
The dots would stretch!
In stretching these dots, all the detailed information they contained would become bigger and blurrier. Suddenly, the image would start to look hazy
Now image the reverse, what would happen if you make the image smaller?
The dots would shrink!
Shrinking the dots, however, is perfectly ok! The information in each dot doesn’t get blurry, it gets sharper! So by making a lovely big image into a lovely small image, it stays lovely!
A basic rule of thumb:
Digital Images should start big and be made smaller.
Check out the example below.

The good thing about WordPress is that it will happily make your image smaller if you ask it to, but it will never attempt to make it larger.